March 5, 2012

Fiesta Chicken Salad

I decided to go through my Better Homes and Gardens cookbook and pick a recipe from each section to try.  This one came from the salad section, and with a few adjustments, it was a total hit.  I served it layered in my trifle bowl, and it looked amazing too.  Even my husband, who isn't usually a fan of salads, was a big fan.  Enjoy!

Image Source
Fiesta Chicken Salad

1/2 head of iceberg lettuce (or about 4 cups), torn or shredded
1/2 cup cheese, shredded (cheddar or pepper jack is a great choice)
1 (15 oz) can black or garbanzo beans (rinsed and drained)
1-1/2 cups cooked, chopped chicken (I cooked mine the same way as I do for my enchiladas with Montreal Chicken Seasoning and cayenne pepper)
1-1/2 cups packed spinach leaves
1 tomato, diced
1 cup jicama, cut into bite-size strips (optional)
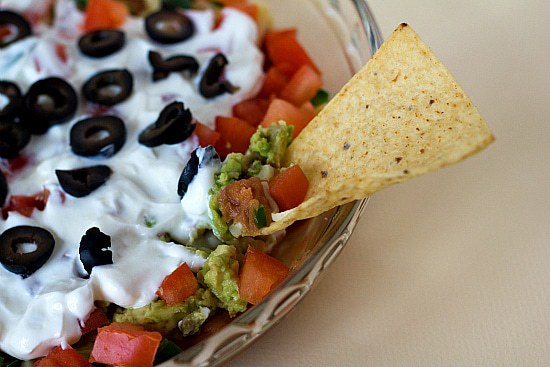
1/2 cup sliced olives (optional)
1/2 cup mayonaisse
1 (4 oz) can chopped green chiles
1/2 tsp garlic powder
1/4 tsp cayenne pepper
1/4 tsp cumin
1 cup crunched up tortilla chips or Fritos

1. Place the iceberg lettuce in a clear salad bowl (a glass bowl or even a trifle dish works well so you can see all the layers).  Top with these layers in the following order: cheese, beans, chicken, spinach, tomato, jicama and olives (if using).
2. In a small mixing bowl, combine the mayonaise, green chiles, garlic powder, cayenne pepper, and cumin.  Stir until well combined.  Pour evenly over the salad, spreading it all the way to the edges.
3. Cover the salad bowl tightly with plastic wrap and chill for at least 4 hours.  Top with crunched tortilla chips and serve immediately.
4. It's fiesta time!

Pin It

March 1, 2012

Easy Focaccia

I'm the kind of gal that really likes her grains--bread in particular.  My day is just not complete if I don't have some type of bread.  Last night, ran out of bread.  And eggs.  So I couldn't even make bread, let alone eat it.  I made it until about 3:30 in the afternoon before I decided that something needed to happen.  I turned to the trusty ingredient search on allrecipes.com and searched for bread recipes that did NOT include eggs.  Lo and behold, this recipe for focaccia came up.  I made it to go with our one-pot spaghetti, and it was delicious.  No, it wasn't entirely authentic Italian bread, but it still tasted amazing anyway.  And for being as easy as it was, it was close enough for me.

Image Source
Easy Focaccia
(adapted from Focaccia Bread on allrecipes.com)

2-3/4 cup flour
1 tsp salt
1 tsp sugar
1 Tbsp instant yeast (you can use active dry yeast, but if you do, you might want to proof it in the warm water before adding it to the rest of the ingredients)
1 tsp garlic powder
1 tsp dried oregano
1/2 tsp dried basil
1 pinch black pepper
1 Tbsp olive oil
1 cup warm water
2 Tbsp olive oil
1 Tbsp grated parmesan cheese
1/2 cup shredded mozzarella cheese (optional)

1.  In a large mixing bowl, combine flour, salt, sugar, yeast (unless you're using active yeast and proofing it first), garlic powder, oregano, basil, and black pepper.  If you need to proof your yeast, add it to the warm water now.  
2.  Add the 1 Tbsp olive oil and the water to the flour mixture, and stir to combine.  Turn out onto a lightly oiled surface and knead until smooth and elastic (about 6-8 minutes).  Place the dough in a lightly oiled bowl and let it rise until doubled in size (about 20-30 minutes).  It raises very quickly because of the high yeast to flour ratio, so you might want to set a timer if you're used to waiting for an hour for the first rise.  Also, the fact that it raises so quickly is a bonus because that means it will be in your mouth that much more quickly!
3.  Gently press your fingers into the dough to let some of the air out, then turn it out onto a greased cookie sheet.  Pat the dough into a rectangle about 1/2 inch thick.  Brush it with the remaining 2 Tbsp olive oil, and top it with the cheeses.  Let it rise for a few minutes more while your oven preheats to 425 degrees F.
4.  Use your fingers to "dimple" the dough by making an indentation every couple of inches, then bake it for 15-18 minutes or until it's golden brown.  Let it cool on a cooling rack for 2-3 minutes, and serve it warm.
5.  Savor every bite.  Get seconds.

Pin It

February 24, 2012

Contact Us

I've been thinking for a while that I need a better way to answer people's questions and take recipe suggestions.  From now on, you can contact me directly by emailing me at:

foodisablessing@gmail.com

Ask a question, give feedback on a recipe, suggest a new recipe I should try, let me know if one of my links is down or there's a grammatical error--whatever.  I only ask that you be respectful if you've got some constructive criticism.  This is a blog of happiness, right?  Also, please don't spam me.  That's just not nice.

I'm excited to hear from you!

February 22, 2012

Sweet & Mashed Potato Bake

A few months ago when I went to Sunflower Market, they had these little recipe cards on display that you could just take.  Great!  I took a few of them, shoved them in the recipe cupboard, and forgot about them.  But this week I made meatloaf and had nothing to go with it.  Meatloaf is one of my favorite foods, but I don't know if an entire meal of just meatloaf is very good for your health... So I opened the recipe cupboard and pulled out one of the Sunflower Market cards.  It sounded intriguing, but because of the lack of advanced planning, I was also lacking on ingredients.  I did a bit of substituting and half-ing, and I ended up with this recipe.  It was delicious.  My husband ate almost the entire batch at one sitting--I'm talking seconds, thirds, fourths, fifths... I think we have a winner, folks.

Image Source
Sweet & Mashed Potato Bake

5-6 russet potatoes (or try it with red potatoes)
2 large sweet potatoes
2 Tbsp butter
1/2 large onion, minced
2 tsp sugar
2 Tbsp butter, divided into two equal parts
1/2 cup milk, divided into two equal parts
2 tsp salt, divided into two equal parts
1/4 cup sour cream
1/2 tsp pepper

1.  Preheat your oven to 350, and lightly grease a casserole dish or 9x13 pan.  Peel and dice your russet potatoes.  Either steam or boil them until they are just tender.  Do the same with the sweet potatoes.
2.  Meanwhile, melt the butter in a skillet over medium heat.  Add the onions and sugar, and reduce the heat to medium-low.  Saute, stirring frequently, until the onions are a deep brown color (10-15 minutes).  If your pan is too hot, they'll burn quickly, so keep an eye on them.
3.  Back to the potatoes.  In a mixing bowl, mash the russet potatoes, and stir in 1Tbsp butter, 1/4 cup of the milk,1 tsp of the salt, and all of the sour cream and pepper.  Set it aside.  In a separate mixing bowl, mash the sweet potatoes, then stir in the remaining butter, milk, and salt.  Now you're reading to assemble your potato bake.
4.  Spread 1/2 of the mashed russet potatoes on the bottom of the casserole dish.  Top the russet potatoes with 1/2 of the mashed sweet potatoes, then sprinkle half of the caramelized onions evenly over the top.  Repeat layers to finish off the casserole.  Cover it, and bake it for 25-30 minutes.
5.  Dish some up for yourself before your husband eats the rest of it.  Enjoy!

Pin It

February 8, 2012

Asian Chicken Avocado Sandwiches

Last night I decided to experiment by combining several recipe ideas and making up something new.  The result was a sandwich that my husband thought would fit perfectly on the Cheesecake Factory sandwich menu.  Success!  It's a keeper, folks, so I'm writing down the recipe before I forget what I did.  This is one of just a few recipes that I feel I can truly claim as my own inventions (my other favorite being Italian Chicken Soup).  I feel so culinary!

Image thanks to spadesnspoons
Asian Chicken Avocado Sandwiches

*Yields 2 sandwiches

1 tsp garlic powder
1 tsp dried ginger
2 Tbsp soy sauce
1/2 Tbsp honey
1 boneless skinless chicken breast
1 avocado
4 thick slices bread (or 2 sandwich rolls)
Mayonaisse (to taste)
Spinach leaves (a handful or two)

1. Preheat oven to 350 degrees F.
2. In a small bowl, mix together garlic powder, ginger, and soy sauce.  When thoroughly mixed, add the honey and let sit for at leats 5 minutes for flavors to blend.  If you have a hard time mixing in the honey, just throw it in the microwave for about 30 seconds, but make sure the spices are all mixed in well because if you microwave it before they are, it will get all clumpy, which will be gross and frustrating.
3. Cut the chicken breast into two thin pieces (think filet style) or pound the chicken flat and then just cut it in half.  The goal is to create two sandwich-sized pieces of chicken out of one chicken breast.  Place them in a small casserole dish.  Pour the sauce even over the chicken, making sure the chicken is covered as well as possible.  Bake at 350 for 40-45 minutes, or until the chicken is cooked through.
4. When the chicken is almost done, toast the bread, and spread each slice with a bit of mayonaisse (if desired).  Pit, peel, and thinly slice the avocado.  To assemble each sandwich, place one piece of chicken on a piece of bread, then top with half of the avocado slices and a handful of spinach.  Top with the other piece of toast.  Repeat to assemble the second sandwich.
5. Pretend you're at Cheesecake Factory.  If you want a bit more flavor, try dipping your sandwich in the leftover sauce--but be warned, it is very strong.  Enjoy!

Pin It

February 3, 2012

Avocado Quesadillas

Quesadillas are yummy, but they can get boring after a while.  Add a bit of color and flavor to yours by adding some avocados, which are both healthy and delicious.  Also, since the superbowl is this weekend, avocados are going to be on the best sale of the year (or darn close).  I price-matched some just last night for 39 cents each.  So buy some avocados at amazing prices and eat them up in an avocado quesadilla.

Image Source
Avocado Quesadillas

*Yields 4 quesadillas

8 tortillas
1 can refried beans
2 avocados, thinly sliced or mashed (I find it's usually just easier to mash them, but it gives it a little bit of texture if you use slices instead.  Also, if you really like the avocado, use a whole avocado for each quesadilla)
1 cup shredded cheddar cheese (or more...)
2 Tbsp cooking oil
Sour Cream & Salsa to taste (optional)

1. Grab two tortillas.  Spread one tortilla with 1/4 of the can of refried beans.  Evenly spread the 1/2 of one avocado on top of the beans.  Sprinkle 1/4 cup cheddar cheese on top, then finish it off with the second tortilla.
2. Repeat with the other tortillas to make a total of 4 quesadillas.
3. Heat the oil in a frying pan over medium heat.  Heat one tortilla at a time, flipping once, until the cheese is melted and the tortilla begins browning.
4. Crack open the sour cream and salsa, and eat your heart out.  Then go buy more avocados while they're still on sale.

January 26, 2012

Chicken Parmesan

Growing up, we always had certain foods on hand--staples, if you will, that were essential.  One of these was parmesan cheese.  Strange, you say?  Delicious, I say!  One of my favorite dishes to make with parmesan cheese is chicken parmesan.  It's a dish that I always seem to forget about, and then when I remember it, I wonder how I ever could have forgotten something so mouth-watering.

Image Source
Chicken Parmesan

1 egg
1 tsp salt
1/8 tsp pepper
4 boneless skinless chicken breasts
3/4 cup dry bread crumbs
1/2 cup olive oil
15 oz tomato sauce
1/4 tsp basil
1/8 tsp garlic powder
1 Tbsp butter
1/2 cup parmesan cheese
8 oz mozzarella cheese, shredded or thinly sliced

1. In a shallow bowl, whisk together the egg, salt, and pepper.  Pour bread crumbs into a separate shallow container.  Dip each chicken breast first into the egg mixture, then into the bread crumbs to coat completely.  I usually put the bread crumbs in a bread bag (you can get them in grocery stores near the sandwich and ziploc bags), and then I put the egged chicken into the bag and shake it all around until it's all evenly coated.
2. Warm the oil in a frying pan over medium heat, then brown the chicken, then pat with paper towels to remove excess oil.  If you need to keep them warm while you make the sauce in the next step, just cover them with foil on a plate and place in a warm oven.
3.  Drain any extra oil from the frying pan, then fill it with the tomato sauce, basil, and garlic powder.  Simmer over medium-low heat for 10 minutes.  Stir in the butter, and heat until it's melted.  Pour the tomato sauce over the chicken, then top it with the parmesan cheese.  If you're running low on time, just open a jar of spaghetti sauce and substitute that instead. 
4.  Cover and bake at 350 for 30 minutes.  Remove the pan from the oven, uncover it, and top with mozzarella cheese.  Bake uncovered for 10 minutes more.  
5.  Buon appetito!

January 23, 2012

Strawberry Ice Cream

My husband got the most incredible Christmas present.  Think of the coolest thing that someone might give you.  It's even cooler than that.  It's a Kitchenaid ice cream maker attachment!  And it is amazing.  I absolutely love it.  We used up an entire Costco carton of heavy cream in just a couple of weeks making amazing ice cream.  So far, this has been our favorite flavor, coming your way from Ben and Jerry.

Image Thanks to The Family Kitchen
Strawberry Ice Cream
(from the Ben and Jerry's Ice Cream and Dessert Book)

1 pint fresh strawberries (12 oz, or just a little less than a 1 lb carton)
1/2 cup sugar
1 Tbsp lemon juice (or the juice of half a lemon)
2 eggs
3/4 cup sugar
2 cups heavy or whipping cream
1 cup milk

1. Hull and slice strawberries.  Place them in a bowl, then stir in the sugar and lemon juice.  Cover, and refrigerate for at least an hour, stirring every 20 or so minutes.  When they're nice and ready, mash them or pulse them in a blender.  Want it chunky?  Mash less.  Want it smooth?  Blend more.
2. Prepare sweet cream base by whipping the eggs until they are frothy.  Whisk in the sugar, followed by the cream and milk.  Stir in the mashed strawberries, and freeze in an ice cream maker according to manufacturer directions.
3. Prepare yourself for rich and creamy deliciousness.
4. Savor every last lick, and then make more!

January 18, 2012

Salsa Chicken

I went to visit a friend the other day, and while I was over she started making salsa chicken.  I asked her for the recipe, made one small tweak, and made it for dinner the next night.  It was amazingly easy and tasted great paired with cilantro lime rice.  I think we found another keeper.

Image thanks to Freezer Meals for Us
Salsa Chicken

4 boneless, skinless chicken thighs (or 2 boneless, skinless chicken breasts)
2 cups (or 16 fluid oz) salsa
1 small can chopped green chiles (optional)

1. Spray the inside of your slow cooker with non-stick cooking spray.
2. Place chicken in slow cooker, and top with salsa.  Cover, and cook on high for about 4 hours (or on low for 8-10).  Note: if you're using chicken breasts, rather than thighs, they may take slightly longer to cook.
3. Remove lid, shred chicken, and return to slow cooker.  Mix shredded chicken and salsa until well-combined.  Taste test.  If it's not spicy enough for you, add the can of chopped green chiles now.  I haven't tried cooking the chiles with the chicken yet, but if any of you out there give it a go, let me know how it turns out.  
4. Serve over rice or with cilantro lime rice.  It would also be amazing wrapped in a tortilla with some sour cream and cheese.  Yum.

January 16, 2012

Seven Layer Dip

I love seven layer dip.  Who doesn't?  Okay, I'm sure there are people who don't like it, but they are probably few and far between.  I found the idea to mix taco seasoning into your sour cream on allrecipes.com, and I liked it quite a bit.  You should make some soon.  You'll be happy you did.

Image Source
Seven Layer Dip

1 can refried beans
8 oz sour cream
1 packet taco seasoning
8 oz guacamole (or substitute chopped avocado)
1 large tomato, diced
1 can olives, sliced
1/4 cup chopped green onions
1/2 cup shredded cheddar cheese
1/2 head iceberg lettuce, torn or sliced (optional)
Tortilla Chips (as many as you can get!)

1. Spread the refried beans in an even layer in a 9x13 dish.
2. Mix together sour cream and taco seasoning, then spread the sour cream mixture in a layer on top of the refried beans.
3. Top these layers with tomato, olives, green onions, cheddar cheese, and lettuce if you want it.
4. Load up a tortilla chip and sit back to watch a football game...or a chick flick...or turn on some Mexican music and don a sombrero--because, hey!  Eating seven layer dip is just plain fun.

Related Posts Plugin for WordPress, Blogger...