June 24, 2011

Porcupine Meatballs

Porcupine meatballs were always a treat growing up.  As a kid, I thought they were so fun to eat.  Really, what kid wouldn't think it was fun to eat a porcupine?  These meatballs are slightly like meatloaf but with a little kick of flavor and some added texture.  This recipe is super easy--only two real steps.  I think you'll love them.

Image Source

Porcupine Meatballs

1 lb ground beef
1/3 cup uncooked white rice
1/4 cup onion, chopped
1/4 water
1 can tomato soup (10 oz)
1/2 tsp chili powder
1/2 cup water

1. Combine ground beef, rice, onion, and 1/4 cup water until well combined.  Form into about 15 meatballs.
2. In a skillet, combine tomato soup, chili powder, and 1/2 cup water until well blended.  Bring to a boil and add meatballs.  Make sure the sauce really covers the meatballs as much as possible to keep the meatballs really moist.  Reduce heat and simmer gently for approximately one hour, stirring occasionally.
3. Eat your porcupines (by themselves or over steaming white rice).

June 20, 2011

Substitutions Tab

Hello readers!  I just wanted to let you know that I've added a new tab to the blog.  It's got a list of common kitchen substitutions you can make if you don't have what you need on hand.  Check out the link to a fairly comprehensive list of herb and spice substitutions--something I use all the time.  If any of you out there have any other substitutions that you commonly use, leave a comment and I'll add it to the list.  And if you like what you've been seeing on the blog, please subscribe.  Thanks, and happy cooking!

June 16, 2011

Fry Bread Scones

Fry bread scones are extremely versatile.  They can be eaten plain, with honey butter and cinnamon, with syrup, or they can be used to make meals like Navajo Tacos.  One day when I was searching for a fry bread recipe I could make quickly (without having to wait for it to rise), I ran across this one and thought it was great.  Give it a try!

Image Source
Fry Bread Scones

2 cups flour
1 Tbsp baking powder
1 tsp salt
1 cup milk
1/2 cup oil

1. In a mixing bowl, combine flour, baking powder, and salt.  Slowly mix in milk with a fork, using just enough milk to make the dough moist.  If you don't use all of the milk, don't worry about it.  Making them too moist makes the dough extremely hard to work with.  If you end up adding too much milk, just add a little flour at a time until you can work with the dough again.
2. Knead dough for 5 minutes, then let dough rest for 5 minutes more.  Meanwhile, heat oil in a skillet over medium heat.  The oil should be about half an inch deep.
3. Separate the dough into individual scone-size pieces, using about 3/4 cup-worth of dough for each scone.  Shape each scone into a round disc about 1/4 inch thick.  For best results, make the middle slightly thinner than the edges of the scone.  
4. Fry each scone in oil until golden brown, turning once.  Remove scones from oil and drain on a paper towel.
5. Top with your favorites toppings and serve.

June 15, 2011

Quinoa

Everybody that's healthy seems to be talking about quinoa lately, so I decided to give it a try.  I use this recipe from allrecipes.com as my start.  I was fairly sure that I would think it was disgusting once I ate it, but I was pleasantly surprised and ended up really enjoying it.  If something healthy can taste great too, that's success in my book. 

Image Source

Quinoa

1 Tbsp butter
1 cup uncooked quinoa
2 cups chicken broth (or 2 cups hot water and 2 chicken bouillon cubes)
1 tsp garlic salt
2 tsps parsley
1/4 tsp salt
1/3 cup onion, chopped
1/2 tsp lemon juice

1. Melt butter in a skillet over medium heat.  Add quinoa and toast for about 5 minutes, stirring occasionally, or until lightly browned.  This seemed like a strange step to me, but it really does make a difference. 
2. Stir in broth and bring to a boil.  Reduce heat, cover, and simmer for 15-20 minutes, or until quinoa is tender.  I like my quinoa a little more tender, so I cooked it for about 25 minutes and loved it.  It's all personal preference.
3. In a medium-sized bowl, toss the quinoa with garlic, parsley, salt, and onion.  Sprinkle with lemon juice just before serving.
4. Be proud of yourself for making something healthy and delicious.

June 14, 2011

Zucchini Bread

I have become slightly obsessed with zucchini bread lately.  I made three loaves in one week, then went out to the store to buy more zucchini.  It's delicious, plus I get to eat vegetables without really even thinking about the fact that I'm eating vegetables.  I hope you enjoy it.

Image Source

Zucchini Bread
(adapted from the Better Homes and Gardens New Cookbook)

1 1/2 cups flour
1 tsp cinnamon
1/2 tsp baking soda
1/2 tsp salt
1/4 tsp baking powder
rounded 1/4 tsp nutmeg
1 egg, beaten
1 cup sugar
1 cup finely shredded, unpeeled zucchini (or about 1 medium-sized zucchini)
1/4 cup oil

1. Preheat oven to 350 degrees.  Grease a loaf pan and set it aside.
2. In a large mixing bowl, combine flour, cinnamon, baking soda, salt, baking powder, and nutmeg.  Make a well in the center.
3. In a medium-sized mixing bowl, combine egg, sugar, zucchini, and oil.  Pour the entire zucchini mixture at once into the well you made in the flour mixture.  Stir until just moistened.  It will be lumpy, and that's a good thing.  Overstirring will actually lessen the quality of the finished bread.
4. Pour batter into prepared loaf pan and bake for 45-50 minutes or until a toothpick comes out clean from the center of the loaf.
5. Cool 10 minutes in pan, then remove from pan and let cool completely on wire racks.  For best results, wrap it up and store overnight before slicing--that is, if you can resist the temptation to eat it right then and there, which I cannot.
6. Eat loaf.  Go to store.  Buy more zucchini.

Meatloaf

The other day my husband and I were watching The Incredibles. There they were, sitting and eating meatloaf for dinner.  I thought to myself, "Wow, meatloaf sounds pretty incredible right now," so I made a meatloaf last night.  I know, you're probably thinking that it's summer, and meatloaf is a winter food.  However, my neck of the woods has been particularly cloudy, rainy, and chilly lately, so I'm totally fine with making meatloaf in June.  After trying a couple of combinations of spices, this is my favorite way to make delicious meatloaf.

* If you want to make it easier to get your meatloaf out of the pan, try lining the pan with aluminum foil.  It will make it easier to get the loaf out of the pan and slice it.

* Short on time?  Don't have an hour and a half to wait for your meatloaf to cook?  Make mini meatloaves in muffin tins!  Fill each tin about 2/3 of the way full with the meat mixture, and you can cut the baking time in half.  Using muffin tins is also a great way to make individual meatloaves that can be frozen and thawed for lunches later on.

Image Source

Meatloaf

2 eggs, slightly beaten
3/4 cup milk
2/3 cup fine dry bread crumbs
1/4 cup onion, chopped
2 tsp parsley
1 tsp salt
1/2 tsp oregano (you can also substitute sage or basil here)
1/8 tsp pepper
1 1/2 lbs ground beef (although, I've made it with just 1 lb before to save money, and it turns out just fine)
1/4 cup ketchup
2 Tbsp packed brown sugar
1 tsp prepared mustard (or 1/2 tsp dry mustard)

1. Preheat oven to 350 degrees.
2. In a medium-sized mixing bowl, combine eggs and milk.  Add bread crumbs, onion, parsley, salt, oregano, and pepper.  Stir until well-mixed.  Add ground beef and mix well.
3. Lightly pat the meat mixture into an ungreased loaf pan.  Bake at 350 for 65-75 minutes.  Spoon off excess fat and drippings.  Actually, I usually just hold up the pan and let the fat drip right out.  I find that to be easier and more thorough than spooning it off.
4. In a small bowl, combine ketchup, brown sugar, and mustard.  Spread evenly over meatloaf and bake for another 10 minutes.
5. Let the meatloaf stand for 10-15 minutes before you slice it so it will stay together and crumble less.  If you're really worried about crumbling meatloaf, make it a day in advance, and it will stay together in slices much better.
6. Serve up some meatloaf with your favorite potato dish and enjoy this delicious comfort food.

June 7, 2011

Zucchini and Yellow Squash

With summer finally coming to my neck of the woods, it's that time again for zucchini and yellow squash.  To me, squash is a perfect summertime side dish because it's light, healthy, and goes with all kinds of meals.  I made this side dish for the first time when I was dating my husband.  Apparently he liked it well enough that a month later we were engaged.  Give it a try!

Image Source
Zucchini and Yellow Squash

1 Tbsp olive oil
1 medium-sized zucchini, sliced
1 medium-sized yellow squash, sliced
1/4 large onion, minced
1/2 tsp garlic salt
1/2 tsp pepper

1. Heat olive oil in a skillet over medium heat while you slice the vegetables.
2. Add zucchini, yellow squash, and onions and saute, stirring frequently, for 6-7 minutes
3. Add garlic salt and pepper.  Stir well and continue to cook until vegetables are desired crispness (2-3 minutes). 
4.  Serve with your favorite summertime meal.

Pumpkin Pie Cake

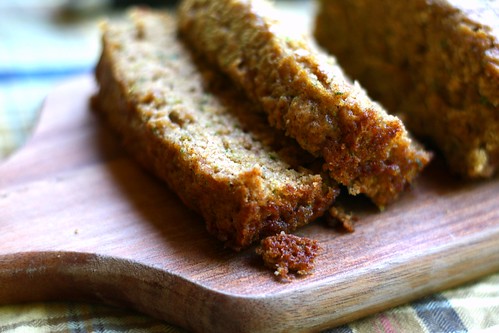
First off, I realize that it's not pumpkin season.  However, my husband brought a piece of this cake home after having lunch with a colleague, and it was delicious.  I had to have the recipe.  And now I have to share it.  Yes, it's practically summer, but I don't care because this dessert is delicious anyway.  When you're making it, you might think, "Wow, this is going to be super unhealthy.  I hope it's worth it!"  Trust me--it is.  My husband and I have found that it's best served chilled with whipped cream on top.

Image Source
Pumpkin Pie Cake

Crust:
1 package yellow cake mix, unprepared (minus 1 cup that you'll reserve for the topping in step #1)
1/2 cup melted butter
1 egg
Filling:
1 29-oz. can of pumpkin puree
1 1/2 cups (or 12 oz.) evaporated milk
1 1/2 cups sugar
4 eggs
1 tsp salt
1 tsp ginger
2 tsp cinnamon
1/4 tsp cloves
1 tsp vanilla
Topping:
1 cup reserved yellow cake mix
1/4 cup sugar
1 tsp cinnamon
1/4 cup butter

1. Take 1 cup of the cake mix and set it aside in a small bowl for later use.  DO NOT SKIP THIS STEP!
2. Preheat the oven to 350 degrees and grease a 9x13 cake pan.
3. Make crust by combining the rest of the yellow cake mix, 1/2 cup melted butter, and 1 egg.  When all ingredients are well mixed, press into a greased 9x13 cake pan.
4. In a large mixing bowl, combine pumpkin puree, evaporated milk, sugar, and eggs.  Beat slightly.  Add salt, ginger, cinnamon, cloves, and vanilla and mix well.  Pour filling evenly over crust.  At this point you may be starting to wonder if it's all going to fit in the pan.  Trust me, it will.
5. In a separate bowl, combine the reserved cake mix, sugar, cinnamon.  Cut in the butter until mixture is crumbly.  Here is where it comes in handy to have a pastry cutter.  I don't, so I put the ingredients in my kitchenaid mixer and used the whisk attachment until it formed nice crumbs.  When all else fails, use a couple of forks.  Sprinkle topping evenly across pumpkin mixture.
6. The pan will be very full by this point, so carefully put the pan in the oven and bake for 60-70 minutes, or until a knife comes out clean from the center.  If you're afraid it will overflow, DO NOT put a cookie sheet underneath to catch the mess.  It will NOT overflow, and the cookie sheet will just prevent it from cooking in the center.  The first time I made it, I didn't cook it long enough, and it turned out too mushy for my taste.  If it's taking a while, just be patient.  It's worth the wait.
7. Chill in the refrigerator and serve topped with whipped cream.
8. Savor the pumpkin taste--even if it's summer!
Related Posts Plugin for WordPress, Blogger...