May 22, 2012

Tip Tuesday #5 {Bake Your Hard-Boiled Eggs}

Image Source
Did you know that you can bake eggs and that they come out just like hard-boiled eggs?  Neither did I!  I didn't, that is, until my brother-in-law informed me of this last week.  Just stick the eggs in a preheated oven and bake them at 325 for 30 minutes.  You can either rest them on the oven rack or put the eggs in muffin tins to keep them from rolling around.  As soon as you take them out of the oven, plunge them in ice water to prevent them from overcooking.  Baked eggs tend to be creamier, less smelly, and generally don't get that gross green color you sometimes get with hard-boiled eggs.  And they're easier to peel!  And honestly, doesn't this sound a lot less technical than most of the boiling methods?  Give it a shot.


May 15, 2012

Tip Tuesday #4 {What to Do When You Forgot the Yeast}


Image thanks to Our Best Bites
Last week I decided to make some delicious homemade bread.  I made the dough, kneaded it, put it in the oven to rise...and came back an hour later to find that the dough hadn't risen at all.  I had forgotten the yeast!  So I did a little investigating (because there is almost nothing I hate more than wasting food) and found that you can add it later and that it actually improves the flavor of your dough slightly by increasing the time the flavors meld together.  Cool, huh?  All you have to do to fix it is dissolve the yeast in just a tablespoon or two of warm water.  When it's all dissolved, knead it right into the dough.  If it's too wet, add a bit more flour to even it out.  Voila!  Perfect dough!  Isn't that awesome?  Three cheers for salvaging almost ruined bread!


May 11, 2012

Hearty Bacon Waffles

Wait!  Before you recoil in disgust at the name of this recipe, just hear me out.  When my husband (then fiance) told me to get excited about having waffle pancakes when we went to meet his family, I was hardly excited.  But the image that popped into my head of a waffle topped with butter, strawberries and whipped cream with a greasy slice of bacon on top was far from the truth.


Never fear, folks.  That's not what this recipe is.  Rather, these whole wheat waffles (which, by the way, don't taste like the gross wheat flavor some of you are probably thinking of) are hearty and delicious.  With crumbled bacon cooked right in, they are delicious by themselves or topped with warm applesauce and cinnamon sugar.

Image Source
I was extremely skeptical before I took my first bite, but now when I go to visit his family, the conversation goes about like this: "Hi!  How are you?  Are we having waffles for breakfast?" I request these pancakes every time we go to see his family.  And I made them myself for the first time the other day.  Am I turning into a wheat person?  Times, they are a-changin'.

Also, did you know that they sell pre-cooked, crumbled bacon at Costco that's perfect for this?  Okay, here we go.

Hearty Bacon Waffles

1 cup wheat berries (if you have a fancy blender that will mill it into flour for you...) OR 1-1/2 cups whole wheat flour
1-1/2 cups milk
1/2 cup oil
2 eggs
4 tsp baking powder
1/2 tsp salt
Crumbled bacon (as much as you want!)

1. Preheat your waffle iron so it's all ready to go.  Who wants to wait for waffles any longer than necessary, really?  Let's get going!
2. If using a fancy blender (like a Blendtec or a Vitamix), blend the wheat berries with 1 cup of the milk for 30-60 seconds or until well combined.  Then add the rest of the milk.  For the rest of us, just combine the wheat flour with all of the milk.
3. Add the oil, eggs, baking powder, and salt.  Mix until well-combined.  Get our your crumbled bacon and put it where it's handy by the waffle iron.
4. Pour some waffle batter into the waffle iron, then sprinkle as many bacon crumbles as you want over the batter.  Close the lid, and cook until the waffles are browned and delicious.
5. Bacon waffles!  Eat them as they are or topped with warm applesauce and cinnamon sugar.

May 8, 2012

Tip Tuesday #3 {Spray Your Cupcake Liners}

Image Source
 Cupcake liners.  They are amazing and wonderful and beautiful.  They make a cupcake look amazing and keep little fingers clean(er) when kids are eating them.  But if you take a second to spray the cupcake liners with non-stick cooking spray before you fill the them with batter, the liners will peel right off without taking part of the cupcakes with them.  The result?  Fewer crumbs (and mess) and more cupcake deliciousness in your mouth.  And who doesn't love more cupcake?

Image Source (which also has the cutest little coconut chick cupcakes!)


May 4, 2012

Irresistible Peanut Butter Cookie Ice Cream Sandwiches

I got this cookie recipe from the label of my peanut butter jar.  It was absolutely incredible.  The cookies were soft, tender, peanut buttery goodness in cookie form.  And then I remembered the good old days of going to Smart Cookie to celebrate that finals were over when I was back at college.  Bam!  Irresistible Peanut Butter Cookie Ice Cream Sandwiches!  You have got to try these.  Now.

Image Source
Irresistible Peanut Butter Cookie Ice Cream Sandwiches

3/4 cup peanut butter
1/2 cup shortening
1-1/4 cups firmly packed brown sugar
3 Tbsp milk
1 Tbsp vanilla
1 egg
1-3/4 cups flour
3/4 tsp salt
3/4 tsp baking soda
Vanilla ice cream (as much as you can pack in there!)

1. Preheat oven to 375 degrees F.  Place sheets of aluminum foil on the counter top for cooling cookies.  I had never heard of this method before, but it worked like a charm.
2. In a large mixing bowl, beat together peanut butter, shortening, brown sugar, milk, and vanilla until well blended.  Add the egg and beat until just blended.
3. In a separate bowl, stir together flour, salt, and baking soda.  Add the flour mixture to the peanut butter mixture and beat at low speed until just blended.
4. Drop spoonfuls 2 inches apart on an ungreased baking sheet.  If you want your cookies to be perfect little cookie circles, just roll the dough into a ball before placing it on the cookie sheet.  Flatten each cookie slightly with a fork in the traditional criss-cross pattern (my favorite part about peanut butter cookies).
5.  Bake for 7-8 minutes or until the cookies are set and just barely beginning to brown.  Cool two minutes on the baking sheet, then transfer the cookies to the aluminum foil sheets to finish cooling completely.  Once they're completely cool, spread some vanilla ice cream on half of the cookies, then top them with the other cookies to make delicious little ice cream cookie sandwiches.
6. Partake.  Are they irresistible?  Oh yes, yes they are.

May 1, 2012

Tip Tuesday #2 {Wash the Dough Bowl with Cold Water}

Today's tip is one that seems obvious once you hear it, but it was like a revelation to me.  After you've just made a delicious dough, it's tempting to fill the bowl up with hot water and get scrubbing.  But the hot water can actually cook the dough (expecially whole grain doughs) onto the bowl, making it nearly impossible to get off.  So what's the solution?  Wash it out first in cold (soak it with cold water if needed), to get off any remaining dough bits.  When it looks pretty clean, then bring on the hot water and get that thing sanitized.  Cool, right?  Give it a shot next time you make dough.

Cold water.  Hot water.  Clean bowl.


April 24, 2012

Tip Tuesday #1 {Foil Your Celery}

I decided to start a new series.  I give you...

...where I give a random tip of the week.  It might be about cooking or baking or grocery shopping or storing food--you get the idea.  So I'm starting this week off with a tip that I learned from the good old family cookbook.

Today's tip: foil your celery.

That's right, by simply wrapping your celery in aluminum foil, it will stay crisp and fresh for a few weeks--rather than getting limp and disgusting after a few days.  Shout hooray!  Now you don't have to feel guilty for buying a whole thing of celery when you only know what you'll do with one stalk.  Why?  Because it will still be good a couple of weeks later when you pull out another recipe calling for celery, which means...no more rotten celery!  And that's something to cheer about.


April 23, 2012

Hey You!

Yes, you.  I just want to say...


Today we hit the 10,000-hits mark.  10,000!  I am amazed.  Thank you all for supporting me in this endeavor and for giving my recipes a try.  Thanks to all of you who've pinned my recipes to pinterest or liked them on facebook.  Thanks to all of you who've given me feedback on my recipes.  Y'all are wonderful.

Have a fantastic day, and keep on cooking!

Chicken Pillows

I love these.  They are fluffy and creamy and flavorful.  Just try them.  Ready?  Go!

Image Source
Chicken Pillows

1-1/4 cup cooked chicken, chopped
3 oz cream cheese, softened
1 small can mushrooms
Salt and pepper to taste
1 pkg refrigerated crescent rolls
1/4 cup butter, melted
1/3 cup bread crumbs (try the seasoned kind for more flavor)
1 can cream of chicken soup
1 cup chicken broth

1. Preheat oven to 400 degrees F.
2. In a medium mixing bowl, combine chopped chicken, cream cheese, mushrooms, salt, and pepper.  Unroll and separate the crescent roll dough.  Place about a heaping tablespoon or two of the chicken mixture in the center of each piece of dough.  Make sure to leave enough chicken for all of the rolls!  Roll the crescent dough around the chicken and crease the edges to form a little ball around the filling.  I find that it's easiest to fold the long, skinny corner across the top, then fold the two smaller corners back toward the long corner.  Make sure the edges are all sealed or you'll have chicken filling oozing out, which nobody wants.
3. Roll each ball in melted butter, then in bread crumbs.  Place the breaded chicken pillows on a baking sheet and bake for 15-20 minutes.
4. Meanwhile, heat the cream of chicken soup and the broth together in a small saucepan until warm.  Poof! Gravy.
5. When your chicken pillows are done, pour a little gravy on top.  It's dinner time!

April 10, 2012

White Bread 101

Growing up, I always thought that making your own bread was something people did back in the day of Seven Brides for Seven Brothers.  It wasn't for me--except maybe if I had a bread machine to use.  But over time, a little flicker of desire to make my own bread grew up in me.  After what felt like a lot of failure, I came across this recipe for white bread in the King Arthur Flour Baker's Companion.  And after some trial and error, I present to you my own version of how to make white bread...or at least how to make it at 4300 feet above sea level in a dry climate... So, are you ready for a lesson?

Welcome to White Bread 101

Image Source
Tip #1: When making bread, weigh your flour if at all possible.  Measuring it out with a measuring cup is (most times) not an accurate way to measure.  Due to humidity, settling of the flour, amount of pre-sifting, and your measuring technique, each cup of flour can be significantly larger or smaller than the next.  When in doubt, weigh!  I feel like all of my problems with making bread in the past stemmed from not following this tip.  People generally tend to put too much flour into things when they use a measuring cup.  This will leave your bread dry, dense, and...gross.  So weigh it instead!  1 cup flour = 4.25 ounces

Tip # 2: Scald the milk, then add the butter to it.  No, you technically don't have to scald for health purposes anymore, but it breaks down the protein, which helps make a better dough.  Also, if you scald the milk, then add cold butter to it, the milk cools to just the right temperature as the butter melts, and you don't have to worry about heating it up to the elusive lukewarm-what-temperature-is-that-anyway-temperature.  To scald it, just put the milk in a small saucepan over medium-low heat.  When tiny bubbles just start to form around the edge of the pan but it hasn't boiled yet, you're good to go.  Easy, right?

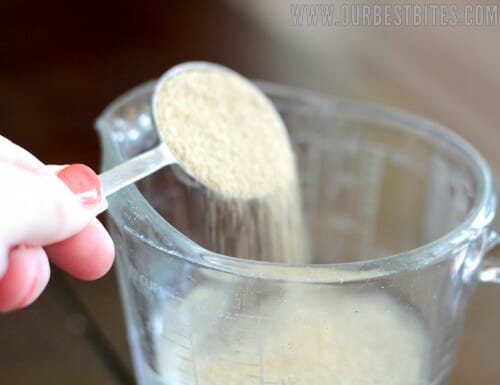
Tip #3: Use instant yeast when possible.  And no, that's not the same thing as active dry yeast.  Instant yeast doesn't need to be proofed beforehand.  If you do need to use active dry yeast, just dissolve it for 10 minutes in your scalded milk and butter mixture before mixing it with the dry ingredients.  But honestly, making bread takes so much time anyway, I'm all for saving that 10 minutes.  Go instant.

Tip #4: Add potato flakes.  Yes, those instant mashed potatoes that do not count as mashed potatoes.  Add them.  They act a bit like potato flour and help the bread hold more moisture.  Bread with potato flakes = moist bread.

Tip #5: Use the right size of loaf pan.  What, you say?  You didn't know there were different sizes?  Neither did I, but there are.  In general, you'll use the size of pan indicated in the recipe (if it actually lists one).  If no pan size is listed, you can figure it out by the amount of flour the recipe calls for.  If your recipe calls for 3-1/2 to 4 cups flour (including other grains, oats, and potato flakes), you'll use a 9x5-inch loaf pan.  If the recipe calls for less than 3-1/2 cups flour, use an 8.5x4.5-inch loaf pan.

*Note: The recipe listed below bakes best in an 8.5x4.5-inch pan, although you can use a 9x5 if that's all you've got.  Just don't expect it to rise above the pan.

Tip #6: Let the dough rise in the right setting.  It took me a long time to figure out which method worked best for me, but after a lot of trial and error, this is the method that I use every time now.  After you've kneaded your dough, place it in a big, lightly-greased glass or metal bowl.  Spray some plastic wrap with non-stick cooking spray, and place it over the top.  Seal off the edges as much as possible.  Place the covered bowl in your oven, and close the oven door.  Leave it closed.  Turn the oven on to warm or the lowest setting available (not broil) and immediately set the timer for 60 seconds!  I speak from experience that if you don't, you'll forget you turned the oven on, and there goes your perfect dough.  When the time goes off, turn off the oven (remember to leave the door closed!), and let it rise for about an hour.  When it's doubled in size, take out the dough, and form it into a loaf.  Place it in a greased loaf pan, cover it with the sprayed plastic wrap, seal the edges as much as possible, and stick it back in the oven.  Turn it on to warm again for 60 seconds, then turn it off.  Once the dough is level with the top of the pan (usually after about 20 minutes for me), take it out of the oven and set it on the stove or counter to finish rising to one inch above the pan.  Meanwhile, preheat your oven to your cooking temperature.  The oven should be preheated at about the same time your dough is the right height for cooking.  Voila!  Simple, right?  You can also use a damp towel instead of the plastic wrap, but I find that the dough still dries out a bit that way.

Tip #7: Don't use your dough as a punching bag.  When a recipe says to "punch down" the dough, don't punch it.  You'll squeeze all of the air out of it, and air = leavening, which is the whole point of letting it rise.  Just gently deflate it with your fingers. That's all you need.  If you go a bit too Rocky with your dough, it will end up being dense.

Tip #8: If it's getting too brown too early, tent it with foil.  Recipes calling for sugar, honey, or a lot of butter tend to brown more quickly.  To prevent this from happening, you can gently lay a piece of aluminum foil over the bread partway through cooking.  Don't pinch it down, just lay it loosely there like a mom would gently lay a blanket over a sleeping baby so as not to wake him up.  The foil allows the bread to keep baking without browning as much.

Phew.  That was a lot.  Are you hanging in there?  Okay, here comes the recipe.

Image Source
White Bread 101
(from King Arthur Flour Baker's Companion--somewhat adapted to my climate)

3 cups + a small handful of flour (or about 13-14 ounces flour)
1/3 cup potato flakes (not potato buds or peals--flakes).
3 Tbsp sugar
2 tsp instant yeast
1-1/4 tsp salt
1-1/8 cups milk (9 fluid ounces)
1/4 cup butter

1. In a large mixing bowl, combine flour, potato flakes, sugar, instant yeast, and salt.  Set aside.  In all honesty, I usually do all of this while I'm scalding the milk (see next step), since they take about the same amount of time anyway.
2. Scald the milk over medium-low heat, then remove the pan from heat and add the butter.  Once the butter has melted completely, pour the milk and butter mixture into the bowl with the flour mixture.  Stir to combine, then knead it all until it's smooth and elastic.  For more info on kneading, see this website.
3. Let it rise until doubled in size (see Tip #6 above).  Gently deflate the dough, form it into a loaf, and place it in an 8.5x4.5-inch loaf pan.  Let it rise until the dough is one inch above the pan.  Meanwhile, preheat your oven to 350 degrees F.
4. Bake for 25 minutes, then tent the loaf with foil and continue baking for another 10-15 minutes or until it sounds hollow when you tap it.  Remove the loaf from the pan immediately, and cool in a wire rack.
5. You did it!  Enjoy your freshly baked homemade white bread.

Related Posts Plugin for WordPress, Blogger...